Monday, February 28, 2011

Motivation to scrap part 3

Morning all. Today I thought we could explore colour combination and dimension on scrapbook layouts. I have always struggled with matching colours, although I have always known that 'red and green should never be seen' (unless at Christmas). I often find that if I buy a stack of papers in a pack then it is much easier to coordinate layouts. All the papers are deisgned to work with each other (duh....I only just realised this!). I love the Echo Park ranges that have been coming out recently as they contain some lovely pinks and greens - one of my favourite colour combinations. I also love grey and pink. Anyway, after having bought myself a colour wheel I am now completely clued up on what goes and doesn't. I would like to share this with you today and hope this makes choosing complimentary papers and embellishments easier and so make your layouts look good.


Colour wheel image taken from The Style and Beauty Doctor blog
So here's how it works: colors opposite each other (like violet and yellow), colors next to each other (like green and yellow-green) and colors that form right angles (like yellow and red-orange) are all colors that will look good together. Look at this card that I made yesterday, it uses colours that are at right angles to each other (yellow and blue). The colours contrast but don't jar:
Sorry about the shadow - I got the angle of the light wrong. The Prima blooms used in this card are from Gotta Craft. You'll see that the card base is orange and that works too because the yellow and orange are next to each other on the colour wheel. One thing you need to be careful of is using all three colours in the same proportions as this will mean that they are all competing with each other. You would be better selecting one main bold colour (blue) and then accenting with two others (orange and yellow). 
This can be a good rule of thumb too - if you select 4/5 colours that are next to each other on the wheel then this is also pleasing to the eye. One last tip with the colour combination is one I like to use a lot  - select one colour and use various tones. This is a great way to make your layouts look 'together'.
 This layout I did a few weeks ago shows how using patterned paper from the same range makes life easier (and cheaper in the long run). Layouts can look a bit more coherent.


 You can also use some of your own handmade embellishments like I have in the next layout in order to compliment the colours in your project


All of the papers in the layout above are by American Crafts and their Dear Lizzy range. It would seem that as I have used polka dot, floral and bunting style papers that all the patterns and colours would jar, but they don't. This is because all the colours compliment each other. So, next time you are looking for the perfect colour to match your favourite papers, look at the other papers in that range - the hard work has been done for you by the manufacturers. That said, if you want to go and choose individual papers then buy them with colour matches in mind. Refer back to the colour wheel above to help you when you are shopping on line. It might just save you frustration, time and money!
I think I'll save dimension for tomorrow as I have droned on a bit about colour today! See you back here tomorrow for more tips and ideas to help you get motivated and creating layouts that you like again!

Motivation to scrap part 2

Morning all. Yesterday I started you off with a few tips to get you motivated to scrap. Today I am going to talk about composition. Now I am no artist or graphic designer, but I think I know what looks good on a layout and what maybe could look better.  Not every layout I do is anywhere near perfect, and sometimes you have to have the courage to stop, walk away from your project for 20 minutes or more and then return and either start again or look at the layout with a fresh pair of eyes and remove, add or move elements.

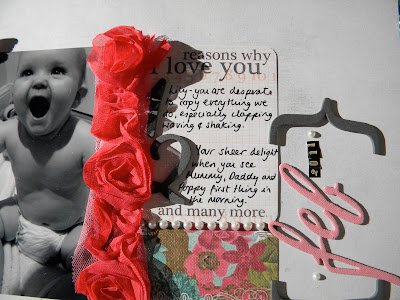
Today's layout is a case in point. It started off very differently, but I think this was the best I could do. I love using plain cardstock as a base for my layouts as sometimes I find that a busy patterned paper just throws me and my layout idea due to its busyness. A way around this is to literally start with a blank canvas. I chose a piece of the lovely Songbird paper from Prima. I tried several ideas for layouts on the beautiful paper on the other side, but in the end I plumped for the grey plain side. This meant that I was in control of the layout, not the paper. Here is the layout

 You can see that I have chosen to position the photo to the left and then added paper elements that are the same width and length. The symmetrical appearance is pleasing to the eye. I have added a shocking pink ruffle ribbon in the centre to draw the eye's attention to both the photo and the journalling. I have added some Prima paper to the bottom which contains some more pink to tie the elements together. You will see that I have used pink fabric Thickers to correspond to the other pink elements on the page. I have punched a small butterfly to add to the top corner of the photo and added a pearl which relates to the pearl border underneath the journalling. You will also notice the pearls around the date. All of these similar elements tie the layout together and lead your eye from the top left to the middle and then the top right. This is how we read and why I think this composition works.


I thought I would recap on the tips I have given you so far about how to motivate you to scrap successfully and enjoy it once again:

1. Try using black and white or sepia toned photos.
2. Try to compose your layouts in a symmetrical way as this is simple technique to start with and pleasing to the eye. Have a look at this other layout I did to see what I mean.
3. If you are using a colour photo, pick out one or two of the colours and use those to help you choose your patterned papers and embellishments.
4. Try using plain cardstock as a base rather than patterned paper - that way you can control the layout. Kraft, black, white, cream and grey are great bases.
5. Use the same or similar accents across your layouts in order to tie all of the elements together.

You can get the vast majority of the papers and embellishments that I use from Gotta Craft. Here is the sketch that I had in my mind when trying to create the layout today.
I would love to hear what you think about any of the tips I have given so far or anything you may be struggling with that I or the DT be able to help you with. Back tomorrow with another layout that will help with colour choices and adding dimensional elements.

Sunday, February 27, 2011

Hello everyone. All over blog and forum land I am reading about people losing their impetus to create layouts, finish them and be happy with them. I really understand this frustration - you can sit staring at your stash for what seems like hours and nothing seems to jump out at you. You look through magazines and blogs and feel even more down about the fact that you think you will never be able to re-create what you see. Even when you start to scrap and stick your elements down, you realise that you don't like your layout and decide that what will help you is to go out and buy more stash, which if you are honest with yourself, will just get stored away until your mojo returns. 
We have all been there or are there now. The answer is not to go out and spend hundreds of pounds on every Prima flower just released or 50 sheets of patterned paper with all the matching accessories. You will never use these things unless you address why you feel you can't start or finish a layout that you are happy with. I feel I can say this because this is exactly how I felt and what I did until recently. I thought I would share some top tips with you this week to get you motivated to scrap. I will obviously include layouts that I have completed following that day's tip. I thought I would show you what I do to get myself going. I try to think about 3 or 4 layouts at a time. I gather up all of the elements I like and think will complement my photo or patterned paper I want to use and place them near each other on my table.


Okay, so today's tip to get your mojo kick started is to print your photos out in various sizes and in black and white only. If you haven't done this before you will be amazed how much easier the whole process of laying out all of your elements can become. By using black and white or sepia even, you will not have the difficulty of matching colour elements in your photo to patterned paper that you don't own. That said, if you do love colour photos then select a key colour from the photo and use that as your starting point for selecting colours of your cardstock and papers. Here is my layout for today:


 This paper is from the Prima Melody collection and has a lovely frame which is a great starting point to help you arrange the elements on your page. I have selected an 8x6 photo which will ensure that it is the main element on my page. I wanted to frame the picture so I used some coordinating Prima flowers and then some AC ruffle ribbon. I have added some large pearl brads and Prima pebbles. You can see that all the elements on the page coordinate and have a 'relationship' with each other. The frame I have made with the flowers and butterfly leads the eye around the page and the rub ons (Lily Bee) provide some balance to the layout as a whole. There is no real journalling on this page but I don't think it's necessary here. The photo says it all. I'll be back tomorrow with tips on composition and dimension.  Here is the sketch I had in my mind when I was creating this simple layout. If you want to see some more examples of my layouts then hop pver to my blog for some ideas.

Wednesday, February 23, 2011

So many goodies .... so little time :)

 Well I spent a wonderful day at the trade show, ..... so here are the pictures I promised .. I warn you now I've gone a little mad with taking so many, so I've tried to show you just the best. I won't waffle on anymore ... just leave you to browse :)


Sorry, for the random way the photos are placed, for some reason I couldn't get them to play nicely today .

Sunday, February 20, 2011

Trade Show ... Here I come

Just wanted to let you know that I'm off to the trade show tomorrow, and I'll be armed with my camera, so I'm going to try my best to bring you lots of yummy sneaky peeks back :)

Friday, February 18, 2011

New Design Team Member

Hello to you all - my name is Hannah and I am the latest member of the Gotta Craft Design Team. Sandra has asked me to introduce myself today, so I thought I would tell you all a little bit about myself. I am 30 and mum to two very precious little girls, Poppy and Lily Rose. They really are my motivation when it comes to scrapbooking. I am fascinated by every little thing that they do and say. I am terrified that I will forget all of these special moments and so I decided this year to make a real effort to record their funny sayings and relationships through a scrapbook. Here is a little taste of a layout that I completed this week using papers from Gotta Craft. They are all from the Echo Park Little Girl range and I have to say I really love it.
My scrap book style has developed over time and can be minimalist and quite graphic, but equally it can be completely over the top - it just depends on the photo I am scrapping and the mood I am in! I will usually go for quite a lot of dimension which makes it difficult to store my work sometimes. I do quite like putting some of my favourite layouts into Ikea shadow boxes and changing them now and then.
 While I like all things girlie, I have recently been trying my hand at black, white and grey layouts which I now love. I did this layout yesterday using some lovely chipboard alphas from the Gotta Craft sale
Anyway, I am delighted to be working alongside Sandra and the very talented Gotta Craft Design Team and look forward to sharing more of my projects and seeing some of yours too!

Wednesday, February 16, 2011

Pretty Prima Papers

Prima have some gorgeous papers and I've used two different ranges for my two layouts. The first one uses papers from the 'Indeed' range, my base paper has an image on an ornate gate on it which I cut around with a craft knife so I could slip my photos underneath it. I then used some Prima Flowers to embellish the page, layering them up with punched flowers to give more dimension.


 The second layout uses papers from the 'Animal Bash' range (apologies for the quality of the photo - there was no daylight today to allow a half decent photo!)


The flowers are really simple to make, they start off as simple circles of paper which you distress a little, spray with water, scrunch up and then flatten out before sticking together. I also inked the edges with a little Tim Holtz distress ink.

Thanks for stopping by.
Clare x

Tuesday, February 15, 2011

Crate Is Great!

I'm Sian and I love a bargain! Have you had a chance to check out all the lovely sale stock yet? I was lucky enough to get my hands on some Crate Paper Lemon Grass and some KI Memories embellishments


and I put them together to make this:


The Lemon Grass really gives a seventies look. When I'm thinking about what to put on a layout I start by deciding the mood I want to create. I don't always go straight for the latest, because it might not be the greatest! Choosing products which support your story and your photo will give your page a lot more impact, so reach back into your stash; or, even better, check out the sale! You might find exactly what you are looking for..

Saturday, February 12, 2011

More inspiration...

Welcome to the weekend, I hope everyone has got something nice in store, whether it's chilling on the sofa, a nice walk in the fresh air or some retail therapy! If you haven't already you will want to check out the sale, there are lots of amazing prices there so a good time to stock up. Here are a couple more projects, the first is a layout, using Fancy Pants 'On a Whimsy' These papers are great as some of  them already have a pretty background on them which make a good basis for your layout.


This card uses the same papers (the more muted back of the papers) along with some pretty Flower Stickers from Me and My Big Ideas. I love working with stickers but to make my life easier I like to stick them onto some thin card or paper first which means I can play around with then design and also I can add foam pads for a bit of height which is what I did with some of the flowers on my card. To finish off I used some Liquid Pearls to add some random swirls amongst the flowers, and some pearls to finish off the centres of some of the flowers.


I hope these projects give you some inspiration, I'll be back soon with more!

Clare x